Okay, so out the gate I'm going to extend the disclaimer that I am NOT a professional chef, cook, baker, etc. (Although I do still dream of someday being found worthy to take the torch from Martha Stewart... me and 50 million other creative ladies, right?).
Anyway, I'm inclined to share observations I've made about egg boiling. Many of you will read this post and snigger that I'd be so ignorant. Glad I could prove entertaining to you. For others who are oblivious, this just may prove to be the handiest thing you've ever read about boiling eggs... or the only thing you've ever read about boiling eggs.
Over the course of my cooking years I've tended to avoid making boiled eggs because, well, they stink. So, I tend to really only find myself preparing them once or twice a year. Once, for sure, at Easter. Maybe a second time when the call of egg salad or deviled eggs is just too much to bear. Also over the course of this time, I've had two schools of thought shared with me about how to prepare an egg. I'll share them as follows, with the pro and con for each.
As a nanny, the man of the house delightedly told me that there's a trick to boiling eggs without them cracking. "You see, you fill a pan with warm to hot water, place the cold eggs in the pan and then let them equalize for about five minutes. THEN turn on the heat to bring the water to a boil. The shells won't expand as much as quickly, hence no cracks." Don't know if that's verbatim how he shared that little tidbit, but boy howdy if he wasn't totally spot on! I think I can count on one hand the number of times an egg cracked since learning this method of prepping.
So, the Pro to this 'equalization' concept is that you'll have less/no cracked eggs. But the Con I've discovered: when the egg cooks, the inner membrane doesn't detach readily from the white, making the eggs sometimes ridiculously hard to peel. Misery.
The other method for boiling eggs is a distant memory from childhood, reconfirmed with (ahem) "diligent" internet surfing. hee hee. Anyway, in this approach, you bring a pan of water to a rolling boil and then use a slotted spoon to gently set eggs fresh from the fridge into the pan. The Pro of this approach is that you will have eggs with shells that peel off incredibly easy (at least, compared to those cooked with the other method). Not sure of the chemistry behind the whole thing, but what is obvious to me is that the inner membrane is separate from the egg white and more strongly attached to the shell, allowing you to pull it off in much larger pieces.
So, the Pro to the 'flash boil' concept is that you'll have easy to peel eggs. But the Con: more cracked eggs. In the past week of Easter egg cooking, I had at least three cracked eggs out of eighteen eggs total.
So, there you have it. Hope this little tidbit helps out at least one frazzled cook in the kitchen where the homely hard-boiled egg is concerned. Happy boiling!
Bold Easter Eggs-Step By Step
My family was so delighted to color eggs earlier this week, we willingly shared some and gobbled some with the aim of doing it one more time.
Keeping blog opportunities in mind, I had the presence of mind to document the process. Some of the pics are from my cell. Some are from my digital camera. Hopefully the photos will do the task justice!
One tip in storing these eggs: I used a carton for the first batch and noted that condensation had a watercolor-type effect on the bottoms of the eggs. So, make two KEY MENTAL NOTES! First, with this second batch, I put a couple napkins in the foam egg carton to prevent condensation. Second, it's safe to assume that some discernment is in order as to whether or not you'd want to be hiding these eggs around the house on fabric-covered items. Just sayin'. Consider yourself WARNED. :D
One tip in storing these eggs: I used a carton for the first batch and noted that condensation had a watercolor-type effect on the bottoms of the eggs. So, make two KEY MENTAL NOTES! First, with this second batch, I put a couple napkins in the foam egg carton to prevent condensation. Second, it's safe to assume that some discernment is in order as to whether or not you'd want to be hiding these eggs around the house on fabric-covered items. Just sayin'. Consider yourself WARNED. :D
 |
| Gel dye from Sweet Art Country Kitchen. Visit them here |
 | |
| Here I have a small coffee cup with 1 T white vinegar |
 |
| I use the blunt end of a wood skewer to add a dollop of dye |
 |
| I use the skewer to dilute the gel as much as possible |
 |
| Here I have done all five colors of dye, plus my own mix for orange |
 |
| I add enough boiling water to make sure the eggs will be covered |
 |
| Finishing adding the boiling water |
 |
| Our work area: the dining table with an old shower curtain topped with an old scrap towel. You can see the remains of our previous egg-dying extravaganza... |
 |
| This egg was just dipped in and then immediately removed. See the potential? |
 |
| The same egg after two minutes in the dye bath. So cheery! |
 |
| Red, after 2 minutes |
 |
| Orange, after 2 minutes |
 |
| Yellow, after 2 minutes |
 | |
| Teal Green, after 2 minutes |
 |
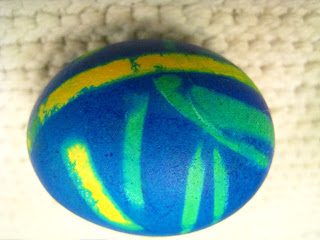
| Blue, after 2 minutes |
 |
| BLACK, after 2 minutes |
 |
| A wonderful rainbow... |
 |
| .....filled with cheer! |
 |
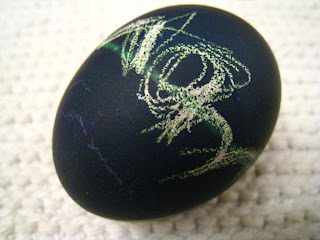
| The beautiful back of that egg dyed in the BLACK dye bath. Again, happy dyeing! |
Easter, Bright and BOLD!
So, I don't know about the rest of you, by in my neck of the woods, Spring decided to explode forth way ahead of schedule. Gardening issues that I thought would hold off until well into April have been clamoring for my attention since the beginning of March. I find this first week of April, and the Easter celebrations, a welcome break from all the garden hustle and bustle. Don't get me wrong, I LOVE working in the garden. It gives me a level of release and satisfaction I can't even begin to describe. Just the same, there's something about decorating Easter eggs that fills the creative need in me like nothing else can.
Here are some photos of Easter eggs dyed last night:


I wanna note that the yellow and orange eggs we made were so vibrant, I couldn't get my camera's macro setting to focus on the egg in the foreground, hence the predominantly blue/green/dark colored eggs. The eggs are brilliant and we had about six kids/adults involved in the egg coloring fun.
Last year it had crossed my mind that, if gel dyes are marketed for effectively tinting large quantities of white icing it would stand to reason that these dyes would be incredibly effective in making vibrant eggs. To test my theory to its most extreme extent, I decided to invest in one small tub of black dye gel. The resulting eggs took my breath away: black being a conglomerate of intense hues, I ended up with each individually dipped egg coming out an extravaganza of blues, purples, magentas and blacks.
So, this year I promised myself I would not surrender to PAAS tablets (sorry, no offense to the childhood memories) nor to the squirt bottles of liquid dye we all find in our local baking section of our grocery store. This year I was gonna foot the bill (a whopping $8) to buy gel dyes for the purpose of egg dyeing. The above eggs are the fruits of our labor and experimentation.
If you'd like to dabble with your own vibrant custom color palette, here's what I did:
*Placed my eggs in rolling boiling water to cook for 15 minutes.
*Drained the eggs and ran cold water over them for a little bit to make them easy to handle.
*For each color I wanted, in one heat-safe cup, I placed 1 generous Tablespoon of white vinegar, a dollop of gel dye the size of a garbanzo bean and enough boiling hot water that an egg would be fully submerged once placed inside (for me, that was roughly 3/4 c). I stirred until it seemed the gel had sufficiently incorporated into the solution.
*Dye away! Even the quickest dip in the dye bath will produce a color brighter than any other dye process I've used before now. Note that the darker deeper colors were made by dipping eggs in multiple often complementary colors and letting them sit for three minutes or more.
Happy dyeing and, much more importantly, a happy and glorious Easter to you! What a truly wonderful day of celebration...
Subscribe to:
Posts (Atom)
