Home, Sweet Home

Shot of our new home, with our Eldest basking in the sunshine of our new gigantic front yard.


Last summer marked a milestone for my hubby and me: we bought our first home!

To be frank, both of us had passed the 40 mark, and were resigned to a life of renting. Buying a home didn't even seem to be within the realm of reality. It was only after a lot of advice from several trusted advisers that we dared to hope for home-ownership. Having the fire lit under our butts to go house hunting only helped push us along (the owner of our previous rental house needed to sell because his job was taking him out of town).

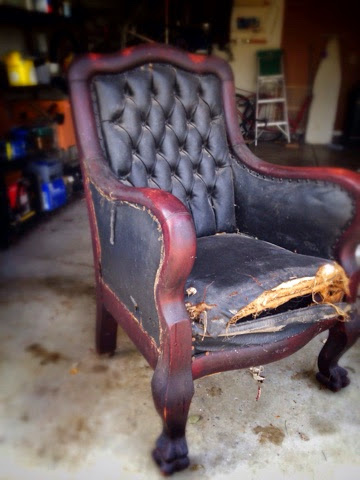
Moving and health issues ended up sidelining a ton of projects I had going on: that big awesome office chair is now sitting patiently, waiting for its moment to shine, in my new garage. But having this new place has introduced a myriad of other creative opportunities for me to express myself, experiment with various Pinterest inspirations and explore new exciting possibilities! I also now have the hope of my own personal work space to finish that chair and oodles of other crafty good stuff.

This house was, and is, nothing short of a miracle. It was built in early 2000, was rather well cared for and sold to us for a song. It did have some cosmetic love that needed to happen, though. And our first summer, we completed a few key exterior updates.

First off, we decided we wanted to add some 'pop' to our lovely lady's street presence. To do that, we needed to augment the monochromatic scheme that was going on.


As you can see, everything but the door and shutters was beige. Not that beige is bad! And I am SOOOO thankful for this home! But with no landscaping to speak of, the beige by itself was just, well, 'blah'.


Now, me and Hubby aren't rolling in dough. We are a one income family and, well hello, we'd just bought a house! We want each of our improvements to be exactly that: an improvement (rather than a DIY disaster). At the same time we are like the average joe: we don't have thousands of dollars laying around to buy all new siding or encase our house in a faux stone facade. My point being we are all about doing quality updates, but in ways that won't be breaking the bank.
 
The most obvious course of action for us involved an investment of a couple hundred dollars in some high quality paints and painting supplies, combined with a hefty amount of elbow grease and neuroses. My primary objective was to liven up the trim, especially there on that lovely little shaded front porch! I mean, for me it's just screaming to be noticed. After bouncing a few different ideas off of Hubby, we settled on using Sherwin William's Emerald line of exterior paints. The colour du jour: Ibis White in a gloss finish. You can learn more about the product here. (And, in case you're wondering: no, I'm not being paid to promote them. We just love their stuff and feel it's worth the extra $$$ for a durable, beautiful high-quality finish).

We haven't bothered with the rain gutters for the time being. The gutters are in good condition, painting them would be a monstrous pain and likely need twice the paint we'd purchased... it just wasn't worth it. Maybe this fall we'll go after them. But, for the time being we're satisfied with just the trim around the edges and the vents for the attic. It looks like a completely different home, doesn't it?!


Not wanting to be limited by a two-tone scheme (because I'm complicated like that), I opted to go with a third color for the porch handrail. Really, I went this route because I know I'm neurotic enough to be driven crazy by fingerprints all over my pristine white porch rail. Hubby concurred that Coffee Bean would be the perfect color for the job. It's rich, dark as the name implies and adds a richness to the overall appearance.

 
 Those of you who are a bit more on the astute side will notice that the door color was also changed. That will be a post for another day!

In the meantime, particularly for any of my friends or followers who have been wondering how to update their exterior without going broke, I hope I've proven to provide some inspiration. Sometimes, something as small as a new coat of paint on just the trim and/or the door can breathe all kinds of new life into your home's exterior!
  

My latest refinishing adventure

I don't even remember what year I found this chair.
Bought for a song at a yard sale, I originally thought it might be made of mahogany, it's so heavy. Now, however, I'm suspecting it might be oak. I should add, though, that I am TERRIBLE at identifying wood, so who knows?...
I'd read about the yard sale somewhere and figured I'd check it out. I had been trolling for used tools, and bought this behemoth instead.

As I remember it, the seller told me he'd found it at an Amish barn sale. It had been found tucked in the back of an old barn, as a matter of fact. The property owner wanted it out of there. So, here I was, dickering over the price. He wanted $75, I think, but I talked him down to $40. At first he wouldn't budge: he'd clearly been watching his Antique Roadshow. But I pointed out the spots on the arms where someone had clearly attempted to sand off the old alligator-crackled shellac finish.
Front leg detail.
I also pointed out that while the seat was clearly leather, other parts were obviously vinyl. So, I got a deal.

It turned out I needed the guy's brother to help bring it back to my place. It weighs around 75-100 lbs. If not for the little wood casters on its feet, I wouldn't be able to move it to save my life!

As the years have passed, I've looked at it guiltily, aching to get started, but unsure of what direction to take. Searching books and web-sites hoping to get some sort of inkling about its history, I'd lose heart and busy myself with other on-going projects. 

And now, for whatever reason, it's on my radar and I aim to do right by it. It's waited long enough!

As I've slowly begun to pull the materials off, I'm simultaneously coming across info that leaves me hopeful my piece is from the mid-1800's while stumbling on things that leave me concerned it's a  1960's Amish DIYer's knock off, lol.
Rusted out decorative furniture tacks over a leather-like banding that was used to trim over the faux leather-like fabric. I've never seen vinyl that has this type of fabric/canvas backing. Underneath, you can see the chair has been stuffed with dried grass. The banding and decorative tacks cover old upholstery tacks that were holding the faux leather in place. You can see the crazing of the finish on the wood, here, the alligator-skin look shellac can get after years of age. This leaves me wondering if the chair is from around the turn of the century.
Peeling back more of the outer arm fabric to reveal not only the backing of the fabric, but also the dense packing of the dried grass.
A cross brace across the lower portion of the arm supports the grass stuffing above. Below it, an opening contains ends of burlap, one piece that has the leather seat cover sewn to it (and was pulled taught and nailed in place over the spring cords), the second piece, the burlap backing for the interior piece of leather covering the inner arm. The upholsterer didn't bother trimming the excess, but folded the extra 6-12" up into the inside of the arm. Within its folds I actually found several very old lady's hair pins/bobby pins.
This piping was across the front of the seat. Weirdly: the seat surface is old leather (as you can see in the picture below) But the front edge of the seat, and the piping, are vinyl. However, this is NOT the same vinyl that is on the outer arms or back of the seat. As you can see, also, the piping was not made of cotton but of twine. The quality of the fabric leaves me thinking this piping and front piece were attempted sometime within the last couple decades.
Here, you can see the leather of the seat top. This same leather also covers the inner arms and inner tufted back of the chair. As you can also see, the leather is so thin and dry, it tears like paper. Beneath this what-looks-like cotton and dried grass is a layer of burlap that covers a grouping of springs that are tied with twine and set on top of furniture strapping. The bottom of the chair (as you can partially see in one of the upper pics that was a close up of the leg) is actually covered in a golden colored upholstery fabric.


I'm hoping I can run my pics by someone who will be able to give me some insight into the history of my piece. I guess we'll have to wait and see!

Ocean Waves Afghan

November of 2013 found me looking at that gigantic yarn stash I've mentioned over and over again... and left me feeling like I wanted to cry. On the one hand, I was feeling incredibly grateful for the generosity of the women who'd given me so much yarn. Still, project after project seemed to be making little, if any, headway in getting my stash down to a manageable size. So, I also had a sense of overwhelming: would I NEVER use up this yarn?   You see, as I've said before (and I'll say it again), it's hard to justify to either myself or my husband that I should buy the latest and greatest yarns out in the crafting world when I have 10,000,000 yards of yarn already languishing in my crafting room.

At the same time, I have a third room in my house that functions as both an office and a guest room... and needed 'something'. The decor was spare: a desk, a folding chair and a daybed were all you'd find. Some of its spartan appearance was due to it having been previously occupied by my Mom. She'd since moved out, generously leaving the bed behind and, hence, solving at least one aspect of our challenge in furnishing that room. Some of the austerity had to do with the fact that the carpet in there is a thick-piled, luxuriously deep, brilliant red. 

Red is a lovely color, adding a rich elegance when properly applied. However, we're talking about a girl who has steeped her living room in turquoises, apple greens and tangerines (looong before it was 'in', thank you very much). Red's not exactly on my radar as a decor color in my home. So, as you can imagine, I've had a hard time wrapping my mind around how to address the 'beautifying' of this space.

Change the carpet, you say.  Well, as a renter of this adorable little ranch, that's simply not an option at the moment. And, even if I owned the place, new floor coverings simply aren't in the budget.

Being the rocket scientist that I am, it's taken living in this home, complete with yarn stash, for almost two-and-a-half years before coming to the realization that yarn and rug complement one another. Seeing as how I'd also just inherited another bed and was in need of bed coverings, I began trolling the internet for crochet afghan patterns. I liked the idea of melding this wide variety of reds, wines, pinks and off-whites to complement the floor covering. Heck, I was hoping I could pull off making it look as though it was all planned. Enter the Ocean Waves Throw.

The pattern itself is simple. I felt trepidation to committing to such a large-scale project, though, knowing that a simple pattern wouldn't necessarily equate to quick closure. I'd have to work at this project morning, noon and night for weeks, nay, months, to have success. I visited the site to read the instructions and ponderously assessed my stash at least four times before finally deciding the benefits outweighed the pain... er... costs involved.

I got started right before Thanksgiving. Between that holiday, cookie exchanges, social commitments and an extended Winter Break (thanks to the snowiest winter on record in our area), I'd seat myself down to attempt busting out a couple rows at a time. Designed to span and drape over the width of a twin bed, one row seemed to go on for an eternity. Two rows created one complete row of a particular color. The original pattern called for five or six different colors. My stash had about eleven. Even at my quickest, I timed myself at one hour and thirty minutes just to finish one row of color (or, two rows total). My mantra through it all: "You're gonna have a cute blanket when you're done, AND you'll have cleared your stash... a cute blanket... an empty stash...cute blanket... empty stash..."

Life's surprises, inconveniences, busy-ness and interruptions certainly attempted to elbow their way in to usurp my attention and draw me away. I mean, really, how long has it been since you last saw me here? Just the same, a half hour here, two hours there (during my little one's nap-time), and slow and steady won the race.

It so happens I over-estimated my stash's abilities: confident I had a mountain of yarn able to knock out a possible queen sized afghan, I actually only had enough to finish half of a twin sized blanket. I'm calling it a 'coverlet'. Yeah, I made a coverlet... because I planned it that way... yeah.

Ultimately, I felt a huge wave of satisfaction when I pulled that last stitch through. I grabbed my scissors, snipped the yarn and sat, incredulous, for a moment. I stared at the blanket; I stared at the stash (which I now have to keep in a large plastic container since our new kitten LOVES to get into my yarn). The amount of encouragement I felt is indescribable. Quickly retrieving my yarn needle, I worked that last piece through, snipped any pieces of yarn peeking through, and immediately made my way to the office.

Draped across the bed, it was made expressly for that room and it looks the part. I love it. I'm so glad I didn't allow the magnitude of the job tempt me to shy away.

And, as Spring (hopefully) lingers ever closer, I find myself feeling hopeful I can accomplish even more exciting projects in the weeks and months to come.


My Own Little Thanksgiving Tradition

It was about ten years ago, while having Thanksgiving at my Aunt and Uncle's, that I was first inspired to attempt my hand at homemade cranberry sauce. I'd been raised eating the tidy round slices of canned cranberry sauce. And I was highly suspect of the canned version, if only because it was too similar in shape and color for me to be sure if I was getting a tart sweet treat... or a mouth full of beets. I'd never given making it myself a second thought. Fast forward to the morning of that fateful day when my cousin started cooking up a batch on the stove.

It was quick and simple. She didn't embellish it much, but embellish it she did. And it was delicious. It was more than delicious, it was heavenly. I kept that experience in the back of my mind, disappointed at subsequent gatherings when my cousin (and her, in my mind, famous cranberry sauce) was absent from the festivities due to the separation of an entire continent. Don't worry, cuz. I missed you, too.

My first Thanksgiving as a married young lady, I decided I needed to try my hand at making the sauce myself. My cousin's directives were simple and, for the most part, were reiterated on the back of the bag of cranberries I'd picked up from the market. The final result was great, but I could imagine more!

Since then, I have dabbled here and dabbled there, tweaking the recipe each year despite resounding exclamations of enjoyment from the masses. And this year I've had several friends fire messages my way, asking if I'd be willing to share my recipe. My homemade cranberry sauce has become my own little statement in the tradition that is Thanksgiving. I love filling the house with its fragrance, and it has become the herald of the start of the holidays in my home.  

So, I thought, in THANKS for all of you who are friends, family and followers, I am GIVING you my recipe. May you enjoy it and/or build upon it for years to come. Happy holidays to you all.  

CRANBERRY SAUCE - MY WAY
1 bag cranberries
1 navel orange, peeled and chopped
1 c sugar
1/4 c orange juice
3/4 c wine (I have used port, rose, zinfandel and riesling all with success)
dash each of ground cloves, cinnamon and allspice

Dump everything in a medium size sauce pan and place on medium-high heat. Stir it periodically to prevent sugar from scalding, cooking to a boil and/or until the berries pop.

Prepare the day before and chill for a good 8 hours. This will help the sauce thicken and let the flavors blend well.


This year, I decided to bolden things: I added the zest of one whole orange. I also augmented the liquids: 1/2 c fresh squeezed orange juice, 1/4 c water and 1/4 c brandy, accented with 1 t lime juice.  MMMmmmmm. 

So, the rule of thumb is to keep the liquid quantity to 1 c, but play around with flavors. With wines, use 1/2-3/4 c and the rest can be water, juice, whatever. If you use a stronger alcohol, take it down to 1/4 c so the resulting flavor isn't too harsh.

Cheers.


Health Kick...

I have been silent for awhile. And to my fair loyalists who have been along for the ride, I am sorry. If you've missed me and ached for the next post... thank you. Sometimes it's nice to be missed for reasons other than a poopy diaper or a grumbling tummy.

So I am back, and I felt compeled to post tonight because of a 2 liter bottle in my home. It contains what some call soda. Others call it pop. Maybe you even take the time to say soda pop. Then there's cola and coke, specific flavors for soft drinks now used as a generic identifier for all things fizzy. If you're my grandma, you'd ask for soda water. And, no, she wasn't talking about Perrier.  With grandma, it was more likely Ginger Ale or some unique flavor of Faygo (back when it was in big clear bottles with minimalistic white labels, and they had names like "Frosh" or flavors like "Pineapple Orange").


http://neighborhoodvalues.com/nv/cookbooks/bklets/Pixs/FaygoDiet.jpg
The soda of my childhood; single bottles in a rainbow of colors.


Anyway, this particular soda is most lovely to look at. The clear bottle transforms the kitchen lights into crystaline ruby sparkles that catch the eye. It's red color reminds me of marachino cherries. The label touts the virtues of a fruit flavored beverage that has "100% Natural Flavors" and is "caffeine free".

Now before my health-nut friends go all crazy on me, I'll gently remind you that I am not in the habit of drinking soda.  It's the rare occasion that I'll partake of a diet soda, and I can't remember the last time I drank regular pop. And as I'm on a strict diet for a health issue, one that prohibits the intake of simple carbs, I assure you that it's not getting consumed in this household.

Having had a birthday party this past weekend, it was bound to happen that a family member would bring along a little something extra. And so here we are, a week after the celebrants are long gone, with 100 % Natural Flavors still hanging out in our fridge.

I wondered what set apart this particular carbonated beverage from others. I mean, really? Was it naturally brewed? Sweetened with apple juice instead of sugar? Had my family member made the virtuous choice and spared us all from one of those 'other' unsavory cola drinks that are so bad for us? Or was he snookered, like so many others, into believing that this purchase was somehow superior to those 'other' carbonated drinks that are so 'bad' for us?

Here's what the ingredient list says on the bottle in question: Carbonated Water, Sugar, Natural Flavor, Citric Acid, Tartaric Acid, Malic Acid, Poassium Benzoate (Preserves Freshness), Potassium Citrate, Red 40, Calcium Disodium EDTA (to protect flavor), Blue 1. I should note that at the top of the nutrition label it says clearly "CONTAINS NO JUICE". The front of the bottle proclaims in all caps "Naturally Sweetened with REAL SUGAR".

The items that concern me are the Tartaric Acid (a naturally occurring alpha hydroxy agent that is used in skin cream. Yes, those creams that make your skin burn. I'd imagine the amount used in pop is way lower. Still, not keen on the idea of consuming an ingredient that makes my pop sour while simultaneously exfoliating my digestive tract...); the Potassium Benzoate, which has too many potential links to too many issues for me to feel good about consuming it; the Red 40; and the sugar content.  One serving of this pop has by weight what ends up being equivalent to about 9 teaspoons of sugar. When I still used sugar, I never placed more than 1 t in my 12 ounce cup of coffee. I can't imagine intentionally dropping 9 teaspoons into my drink.

And yes, I remember as a kid gleefully enjoying a Big Gulp of soda from the local 7 Eleven. Today, the idea of drinking that much soda makes me cringe (and feel slightly sick). And in the grander scheme of things I suppose a person could consume something way more awful that this soda that's in my fridge? 

I just know it's still sitting there, about to be dumped into the great soda graveyard in my sink. Hopefully the soda is as non-toxic to the groundwater as it supposedly is to our bodies.