My latest refinishing adventure

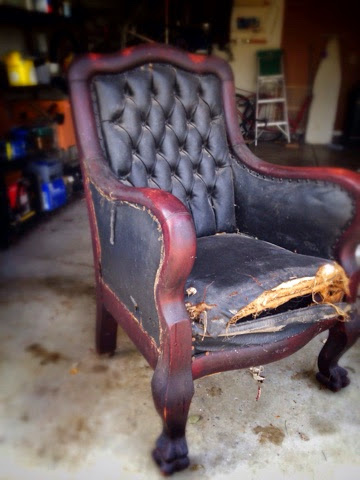
I don't even remember what year I found this chair.
Bought for a song at a yard sale, I originally thought it might be made of mahogany, it's so heavy. Now, however, I'm suspecting it might be oak. I should add, though, that I am TERRIBLE at identifying wood, so who knows?...
I'd read about the yard sale somewhere and figured I'd check it out. I had been trolling for used tools, and bought this behemoth instead.

As I remember it, the seller told me he'd found it at an Amish barn sale. It had been found tucked in the back of an old barn, as a matter of fact. The property owner wanted it out of there. So, here I was, dickering over the price. He wanted $75, I think, but I talked him down to $40. At first he wouldn't budge: he'd clearly been watching his Antique Roadshow. But I pointed out the spots on the arms where someone had clearly attempted to sand off the old alligator-crackled shellac finish.
Front leg detail.
I also pointed out that while the seat was clearly leather, other parts were obviously vinyl. So, I got a deal.
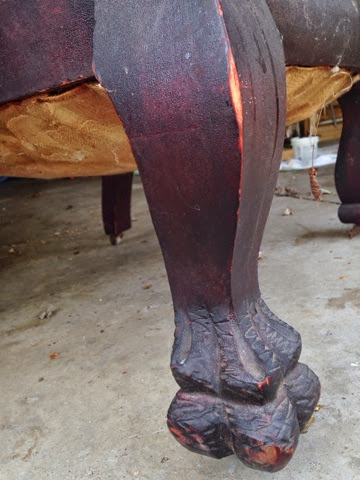
It turned out I needed the guy's brother to help bring it back to my place. It weighs around 75-100 lbs. If not for the little wood casters on its feet, I wouldn't be able to move it to save my life!

As the years have passed, I've looked at it guiltily, aching to get started, but unsure of what direction to take. Searching books and web-sites hoping to get some sort of inkling about its history, I'd lose heart and busy myself with other on-going projects. 

And now, for whatever reason, it's on my radar and I aim to do right by it. It's waited long enough!

As I've slowly begun to pull the materials off, I'm simultaneously coming across info that leaves me hopeful my piece is from the mid-1800's while stumbling on things that leave me concerned it's a  1960's Amish DIYer's knock off, lol.
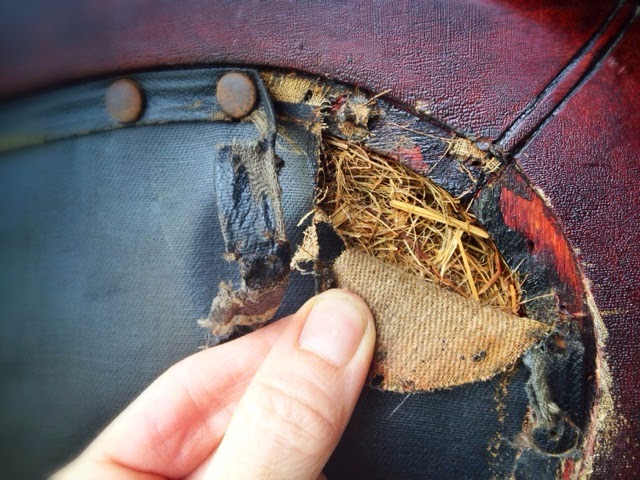
Rusted out decorative furniture tacks over a leather-like banding that was used to trim over the faux leather-like fabric. I've never seen vinyl that has this type of fabric/canvas backing. Underneath, you can see the chair has been stuffed with dried grass. The banding and decorative tacks cover old upholstery tacks that were holding the faux leather in place. You can see the crazing of the finish on the wood, here, the alligator-skin look shellac can get after years of age. This leaves me wondering if the chair is from around the turn of the century.
Peeling back more of the outer arm fabric to reveal not only the backing of the fabric, but also the dense packing of the dried grass.
A cross brace across the lower portion of the arm supports the grass stuffing above. Below it, an opening contains ends of burlap, one piece that has the leather seat cover sewn to it (and was pulled taught and nailed in place over the spring cords), the second piece, the burlap backing for the interior piece of leather covering the inner arm. The upholsterer didn't bother trimming the excess, but folded the extra 6-12" up into the inside of the arm. Within its folds I actually found several very old lady's hair pins/bobby pins.
This piping was across the front of the seat. Weirdly: the seat surface is old leather (as you can see in the picture below) But the front edge of the seat, and the piping, are vinyl. However, this is NOT the same vinyl that is on the outer arms or back of the seat. As you can see, also, the piping was not made of cotton but of twine. The quality of the fabric leaves me thinking this piping and front piece were attempted sometime within the last couple decades.
Here, you can see the leather of the seat top. This same leather also covers the inner arms and inner tufted back of the chair. As you can also see, the leather is so thin and dry, it tears like paper. Beneath this what-looks-like cotton and dried grass is a layer of burlap that covers a grouping of springs that are tied with twine and set on top of furniture strapping. The bottom of the chair (as you can partially see in one of the upper pics that was a close up of the leg) is actually covered in a golden colored upholstery fabric.


I'm hoping I can run my pics by someone who will be able to give me some insight into the history of my piece. I guess we'll have to wait and see!

Ocean Waves Afghan

November of 2013 found me looking at that gigantic yarn stash I've mentioned over and over again... and left me feeling like I wanted to cry. On the one hand, I was feeling incredibly grateful for the generosity of the women who'd given me so much yarn. Still, project after project seemed to be making little, if any, headway in getting my stash down to a manageable size. So, I also had a sense of overwhelming: would I NEVER use up this yarn?   You see, as I've said before (and I'll say it again), it's hard to justify to either myself or my husband that I should buy the latest and greatest yarns out in the crafting world when I have 10,000,000 yards of yarn already languishing in my crafting room.

At the same time, I have a third room in my house that functions as both an office and a guest room... and needed 'something'. The decor was spare: a desk, a folding chair and a daybed were all you'd find. Some of its spartan appearance was due to it having been previously occupied by my Mom. She'd since moved out, generously leaving the bed behind and, hence, solving at least one aspect of our challenge in furnishing that room. Some of the austerity had to do with the fact that the carpet in there is a thick-piled, luxuriously deep, brilliant red. 

Red is a lovely color, adding a rich elegance when properly applied. However, we're talking about a girl who has steeped her living room in turquoises, apple greens and tangerines (looong before it was 'in', thank you very much). Red's not exactly on my radar as a decor color in my home. So, as you can imagine, I've had a hard time wrapping my mind around how to address the 'beautifying' of this space.

Change the carpet, you say.  Well, as a renter of this adorable little ranch, that's simply not an option at the moment. And, even if I owned the place, new floor coverings simply aren't in the budget.

Being the rocket scientist that I am, it's taken living in this home, complete with yarn stash, for almost two-and-a-half years before coming to the realization that yarn and rug complement one another. Seeing as how I'd also just inherited another bed and was in need of bed coverings, I began trolling the internet for crochet afghan patterns. I liked the idea of melding this wide variety of reds, wines, pinks and off-whites to complement the floor covering. Heck, I was hoping I could pull off making it look as though it was all planned. Enter the Ocean Waves Throw.

The pattern itself is simple. I felt trepidation to committing to such a large-scale project, though, knowing that a simple pattern wouldn't necessarily equate to quick closure. I'd have to work at this project morning, noon and night for weeks, nay, months, to have success. I visited the site to read the instructions and ponderously assessed my stash at least four times before finally deciding the benefits outweighed the pain... er... costs involved.

I got started right before Thanksgiving. Between that holiday, cookie exchanges, social commitments and an extended Winter Break (thanks to the snowiest winter on record in our area), I'd seat myself down to attempt busting out a couple rows at a time. Designed to span and drape over the width of a twin bed, one row seemed to go on for an eternity. Two rows created one complete row of a particular color. The original pattern called for five or six different colors. My stash had about eleven. Even at my quickest, I timed myself at one hour and thirty minutes just to finish one row of color (or, two rows total). My mantra through it all: "You're gonna have a cute blanket when you're done, AND you'll have cleared your stash... a cute blanket... an empty stash...cute blanket... empty stash..."

Life's surprises, inconveniences, busy-ness and interruptions certainly attempted to elbow their way in to usurp my attention and draw me away. I mean, really, how long has it been since you last saw me here? Just the same, a half hour here, two hours there (during my little one's nap-time), and slow and steady won the race.

It so happens I over-estimated my stash's abilities: confident I had a mountain of yarn able to knock out a possible queen sized afghan, I actually only had enough to finish half of a twin sized blanket. I'm calling it a 'coverlet'. Yeah, I made a coverlet... because I planned it that way... yeah.

Ultimately, I felt a huge wave of satisfaction when I pulled that last stitch through. I grabbed my scissors, snipped the yarn and sat, incredulous, for a moment. I stared at the blanket; I stared at the stash (which I now have to keep in a large plastic container since our new kitten LOVES to get into my yarn). The amount of encouragement I felt is indescribable. Quickly retrieving my yarn needle, I worked that last piece through, snipped any pieces of yarn peeking through, and immediately made my way to the office.

Draped across the bed, it was made expressly for that room and it looks the part. I love it. I'm so glad I didn't allow the magnitude of the job tempt me to shy away.

And, as Spring (hopefully) lingers ever closer, I find myself feeling hopeful I can accomplish even more exciting projects in the weeks and months to come.


My Own Little Thanksgiving Tradition

It was about ten years ago, while having Thanksgiving at my Aunt and Uncle's, that I was first inspired to attempt my hand at homemade cranberry sauce. I'd been raised eating the tidy round slices of canned cranberry sauce. And I was highly suspect of the canned version, if only because it was too similar in shape and color for me to be sure if I was getting a tart sweet treat... or a mouth full of beets. I'd never given making it myself a second thought. Fast forward to the morning of that fateful day when my cousin started cooking up a batch on the stove.

It was quick and simple. She didn't embellish it much, but embellish it she did. And it was delicious. It was more than delicious, it was heavenly. I kept that experience in the back of my mind, disappointed at subsequent gatherings when my cousin (and her, in my mind, famous cranberry sauce) was absent from the festivities due to the separation of an entire continent. Don't worry, cuz. I missed you, too.

My first Thanksgiving as a married young lady, I decided I needed to try my hand at making the sauce myself. My cousin's directives were simple and, for the most part, were reiterated on the back of the bag of cranberries I'd picked up from the market. The final result was great, but I could imagine more!

Since then, I have dabbled here and dabbled there, tweaking the recipe each year despite resounding exclamations of enjoyment from the masses. And this year I've had several friends fire messages my way, asking if I'd be willing to share my recipe. My homemade cranberry sauce has become my own little statement in the tradition that is Thanksgiving. I love filling the house with its fragrance, and it has become the herald of the start of the holidays in my home.  

So, I thought, in THANKS for all of you who are friends, family and followers, I am GIVING you my recipe. May you enjoy it and/or build upon it for years to come. Happy holidays to you all.  

CRANBERRY SAUCE - MY WAY
1 bag cranberries
1 navel orange, peeled and chopped
1 c sugar
1/4 c orange juice
3/4 c wine (I have used port, rose, zinfandel and riesling all with success)
dash each of ground cloves, cinnamon and allspice

Dump everything in a medium size sauce pan and place on medium-high heat. Stir it periodically to prevent sugar from scalding, cooking to a boil and/or until the berries pop.

Prepare the day before and chill for a good 8 hours. This will help the sauce thicken and let the flavors blend well.


This year, I decided to bolden things: I added the zest of one whole orange. I also augmented the liquids: 1/2 c fresh squeezed orange juice, 1/4 c water and 1/4 c brandy, accented with 1 t lime juice.  MMMmmmmm. 

So, the rule of thumb is to keep the liquid quantity to 1 c, but play around with flavors. With wines, use 1/2-3/4 c and the rest can be water, juice, whatever. If you use a stronger alcohol, take it down to 1/4 c so the resulting flavor isn't too harsh.

Cheers.


Health Kick...

I have been silent for awhile. And to my fair loyalists who have been along for the ride, I am sorry. If you've missed me and ached for the next post... thank you. Sometimes it's nice to be missed for reasons other than a poopy diaper or a grumbling tummy.

So I am back, and I felt compeled to post tonight because of a 2 liter bottle in my home. It contains what some call soda. Others call it pop. Maybe you even take the time to say soda pop. Then there's cola and coke, specific flavors for soft drinks now used as a generic identifier for all things fizzy. If you're my grandma, you'd ask for soda water. And, no, she wasn't talking about Perrier.  With grandma, it was more likely Ginger Ale or some unique flavor of Faygo (back when it was in big clear bottles with minimalistic white labels, and they had names like "Frosh" or flavors like "Pineapple Orange").


http://neighborhoodvalues.com/nv/cookbooks/bklets/Pixs/FaygoDiet.jpg
The soda of my childhood; single bottles in a rainbow of colors.


Anyway, this particular soda is most lovely to look at. The clear bottle transforms the kitchen lights into crystaline ruby sparkles that catch the eye. It's red color reminds me of marachino cherries. The label touts the virtues of a fruit flavored beverage that has "100% Natural Flavors" and is "caffeine free".

Now before my health-nut friends go all crazy on me, I'll gently remind you that I am not in the habit of drinking soda.  It's the rare occasion that I'll partake of a diet soda, and I can't remember the last time I drank regular pop. And as I'm on a strict diet for a health issue, one that prohibits the intake of simple carbs, I assure you that it's not getting consumed in this household.

Having had a birthday party this past weekend, it was bound to happen that a family member would bring along a little something extra. And so here we are, a week after the celebrants are long gone, with 100 % Natural Flavors still hanging out in our fridge.

I wondered what set apart this particular carbonated beverage from others. I mean, really? Was it naturally brewed? Sweetened with apple juice instead of sugar? Had my family member made the virtuous choice and spared us all from one of those 'other' unsavory cola drinks that are so bad for us? Or was he snookered, like so many others, into believing that this purchase was somehow superior to those 'other' carbonated drinks that are so 'bad' for us?

Here's what the ingredient list says on the bottle in question: Carbonated Water, Sugar, Natural Flavor, Citric Acid, Tartaric Acid, Malic Acid, Poassium Benzoate (Preserves Freshness), Potassium Citrate, Red 40, Calcium Disodium EDTA (to protect flavor), Blue 1. I should note that at the top of the nutrition label it says clearly "CONTAINS NO JUICE". The front of the bottle proclaims in all caps "Naturally Sweetened with REAL SUGAR".

The items that concern me are the Tartaric Acid (a naturally occurring alpha hydroxy agent that is used in skin cream. Yes, those creams that make your skin burn. I'd imagine the amount used in pop is way lower. Still, not keen on the idea of consuming an ingredient that makes my pop sour while simultaneously exfoliating my digestive tract...); the Potassium Benzoate, which has too many potential links to too many issues for me to feel good about consuming it; the Red 40; and the sugar content.  One serving of this pop has by weight what ends up being equivalent to about 9 teaspoons of sugar. When I still used sugar, I never placed more than 1 t in my 12 ounce cup of coffee. I can't imagine intentionally dropping 9 teaspoons into my drink.

And yes, I remember as a kid gleefully enjoying a Big Gulp of soda from the local 7 Eleven. Today, the idea of drinking that much soda makes me cringe (and feel slightly sick). And in the grander scheme of things I suppose a person could consume something way more awful that this soda that's in my fridge? 

I just know it's still sitting there, about to be dumped into the great soda graveyard in my sink. Hopefully the soda is as non-toxic to the groundwater as it supposedly is to our bodies.

More Fun Cooking With Squash

I have to laugh as I read the title of today's blog, because I am an historical 'squash hater'. You certainly wouldn't know it, having the topic of cooked squash occupying space in my day to day thoughts for two posts straight. But it's true.  As a kid, I can remember feeling a twinge of despair as I'd spy my Mom retrieving a translucent bag of yellow crooked neck squash from the crisper. Swimming in creamy, cheesy sauce and topped with crispy buttery topping, I still had to fight the gag reflex with each bite of squash casserole.

Squash was gross. My childhood (and 20-something) opinion was that yellow and orange veggies just shouldn't be. Veggies are meant to be savory, not sweet. To contemplate placing maple syrup, cinnamon, brown sugar, or any other item relegated to baking foodstuffs, on any vegetable was sacrilegious. And any veggie (or I suppose, in this technical case, fruit) that had a hint of sweetness to it was not making its way onto my plate or into my mouth. Yellow squash, acorn squash, pumpkin, carrots, yellow peppers... forget it. In the Land of the Free, sure as shootin' this kid was never going to voluntarily prepare squash, or any other yellow/orange plant item, as an adult. Or make my kids eat something so utterly disgusting. Pinky promise or may I never eat another Hostess baked treat for the rest of my life. 

Yet here I am, not only cooking squash, eating it myself and feeding it to my children. I'm also sharing the recipe because, well, it turned out good. (And, yes, I no longer consume Hostess treats. Sorry Twinkie. And, yes, I do eat carrots and yellow peppers now, too.)

The biggest help to overcoming my closed-mindedness was starting the Specific Carbohydrate Diet. It is highly restrictive, especially in the beginning, eliminating a majority of foods in the 'American' diet, and gradually reintroducing non-processed non-simple carbohydrate containing foods. The endeavor is to determine those foods your body can, or cannot, tolerate. To read more about that, you can go to this wonderfully informative web-site: The Specific Carbohydrate Diet  Or, you can look up the book by Elaine Gottschall, "Breaking The Vicious Cycle". If you decide the diet might work for you, then reading the book is a must. If, after reading the book, you still have the cajones to do the diet, then I recommend you join a support group like the Yahoo Group BTVC-SCD.

Anyway, I digress. What was hysterical (well, not at the time, really) when I first started the diet was that on the very short list of things to eat in the beginning, cooked carrots were somethings I could eat without limit. Welcome to Hell.

The initial weeks of the diet were challenging, at best, as the following veggies that could be added to my limited selection were things like butternut squash. Acorn squash. Spaghetti squash. I had decided to do the diet with my eyes wide open. I'd looked at the Introductory foods, then the first stage of foods for reintroduction, and I knew I had a lot more to overcome than my disease. It was time to kill a palate road block once and for all.

I did a lot of research. A LOT of research. I became particularly fond of a site called Veg Web, which is geared toward vegans. It actually has a lot of stuff I can't eat, ironically enough, because grains and things like milk and soy are on the list of no-no's as my gut heals. Just the same, the creativity with the likes of carrots and squash was enough to inspire me into mixing things up a bit. There is plenty there that I can eat, if I choose not to be picky.

What began as timid experimentation has turned into a love of exploration. I am amazed now at the versatility of carrots and squash. And I'm grateful that my health journey has led me down a road to appreciate these sweet treats from the ground.

All that, shared with you to help you know that I've not always been an ardent veggie-lover, to segue to my recipe:

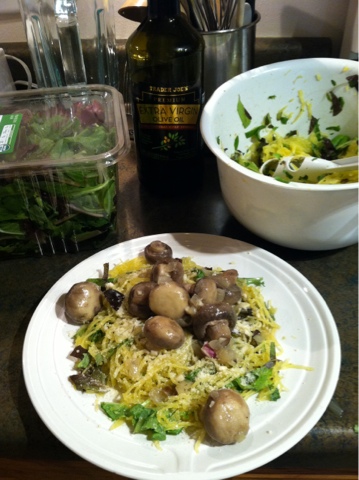
SCD Spaghetti with Wilted Field Greens, Sauteed Mushrooms and Garlic Butter Sauce
Main Course: 4 - 6 servings
Side Dish: 6 - 8 servings

Microwave safe dish
Medium skillet, with lid
Medium bowl
Stirring utensil
Tossing utensil

1 large spaghetti squash, cut in half and deseeded
1/4 large sweet onion, minced
3 cloves garlic, minced
2 T butter
2 T olive oil
24 oz. white button mushrooms*
2 generous handfuls of fresh field greens**, chopped coarsely
salt and pepper to taste
Parmesan cheese for sprinkling
1 c water
 
 First, place water in the microwave safe dish, then set one half (or both, if they'll fit) of the spaghetti squash cut side down into the water. Put the dish into the microwave and cook until soft (this can take anywhere from 7-12 minutes, depending on your microwave and the squash). If you're suspect of microwaves and their impact on your food, you can always place your squash halves in a baking pan instead and cook in a 350F oven for about 30 minutes or so. Again, you're looking for softness.

While your squash is cooking, heat up your skillet over medium heat, adding the butter and olive oil.  Stir them together once the butter's melted, then add the garlic to the pan.  Let it cook for about 1 minute, stirring well so it doesn't burn, before adding the onions. Cook the onions for about 3 minutes more, letting them start to turn translucent.  Now you'll add the mushrooms. Sprinkle with salt and pepper to your liking. Keep in mind that this will be a sauce to coat the noodles, so be generous. If not, it'll be too bland. I used about 1/2 t. 

Once you've coated the mushrooms well, lower the heat a little bit and cover the pan so that they can release their juices and take on the flavors of the garlic and onion.

When your squash is finished cooking, you can scoop out its insides into the medium bowl. The squash will be very hot, so use care. Use tongs or a spaghetti spoon to toss the fresh greens in with the freshly cooked squash noodles. The heat from the squash will wilt the greens.

Your mushrooms should be done by now. Taste the liquid to be sure it is to your liking, adding butter, oil, salt or pepper if you feel it necessary. Otherwise, remove from heat, plate the noodles, top with a scoop of the mushrooms (being sure not to neglect the liquid) and sprinkle with Parmesan to taste. Yum!
My daughter's plate, where I've sliced the mushrooms to make them bite sized 
My hubby's plate, a much larger serving and with the mushrooms left whole


*Mushrooms - You can slice them or leave them whole. You could also experiment with other mushroom types.

**Field Greens - Spinach or kale would also work great with this recipe. If you are on the SCD diet and have not transitioned to raw veggies yet, simply cook the greens up well before adding them.
 

Painting, Cooking and Traveling To Old Stomping Grounds

It wasn't too long ago that I learned that a dear friend of mine will be moving. Her family, like so many others, had been the victim of layoffs in the economic downturn. Hubby is an engineer in a specialized field and found himself laid-off by the company he'd served for so long. As his company opted to relocate to the next state over, our city became flooded with hundreds of out of work engineers all looking for a job. After nine months, he's finally secured one. 250 miles away. Sigh. Two of my neighbors, husbands both employees of the same company, have also moved away in this past week having had to settle for work anywhere they could get it. Which wasn't here. SIGH.

My dear friend's hubby is already there, transplanted and working. She, on the other hand is here, working, caring for her kids and trying to get her house ready to sell in an abysmal housing market. So I've been painting. Painting a lot. I went to her house with my plethora of paint fans and we picked two warm neutral colors. We picked a lovely white for the ceiling, doors and trims. The rest has been elbow grease, sweat, a few tears and plenty of trips down memory lane as we splatter ourselves with paint (nothing like using a 1/2" roller on popcorn ceilings to really make things fun). It's been bittersweet being able to use my skills to help my friend. I only wish it was a task preparing her home for moving in, not moving away.

On a completely separate note, as you get to know me better, you'll learn that my diet is quite the adventure.  I have Crohn's Disease. We'll trip the light fantastic about that saga of my life on another day. What's pertinent to today's post is that I was introduced to a diet, the Specific Carbohydrate Diet,that helps me keep my CD under control. My cousin pointed me in its direction, knowing the battles I've faced with this disease. Given the choice of healing myself with chemicals or foods, I'll choose foods, thank you.

I really enjoy cooking, so I'm always up for adventures. I spend a good amount of time trying to come up with tasty recipes that are SCD friendly that I will like and, more importantly, the rest of my family who's not on the SCD will like. I recently came up with 'a keeper', according to my hubby. So, I'm going to share it with you guys. It should be noted that SCD recipes are always Gluten-Free (as all grains are off limits) for any of my friends who deal with gluten intolerance or Celiac Disease.

SCD Baked Summer Squash Rounds
Serves 4 - 6
*Preheat oven to 425 F

1-2 large cooking sheets
1 gallon Ziploc bag
1 medium mixing bowl
1 wide shallow bowl (for dredging)

4-6 yellow squash, cut in to 1/4" thick rounds
2 beaten eggs, salted to taste
1 c almond meal/flour
1/2 c grated parmesan
1/4 t salt (optional)
1/8 t ground black pepper (optional)
1 t marjoram
1/4 t paprika
2 t oregano
2 t parsley
1 t thyme
1/2 t taragon

Put the sliced squash into the Ziploc bag, pour in the beaten egg, seal the bag well and shake until slices are well coated. Set aside.

Remaining ingredients go into a medium mixing bowl, stirred until everything's well distributed.  This is your 'breading', for lack of a better term! Place about 1/2 c into the dredging bowl. Have your baking pans on hand; you'll be placing your squash medallions onto the sheets as you go.

Open up the baggie, grab a piece of squash and lightly tap it into the almond/parmesan mix. 

 It's important you not press the squash pieces down into the nut meal mixture too hard or you'll get too thick a coating (which could make for a serious bellyache later on).  You'll still be able to see portions of the squash flesh peeking out from the moderate speckling of the crumbs, as shown in the pictures.


Line up your finished work onto your pans and don't worry about crowding. They'll do just fine. I also didn't worry about oiling my pans, but you can do so if you're concerned about the parmesan causing them to stick.


Set your pans into the preheated oven and bake for 20-30 minutes. I let them set for about 5-10 minutes once I took them out, just so my kids wouldn't burn themselves when digging in. The heat up great the next day, too!


*I have also pan fried these successfully, in which case I used a cast iron skillet with canola oil. I cooked them over medium heat until nicely brown on each side (about 5 minutes per side). But you must drain them before serving, otherwise the combined fat of the nuts, cheese and canola could leave you with a sick tummy. The added warning being that, if fried stove-top these shouldn't be eaten exclusively, but supplemented with another veggie that's been steamed or poached.


Lastly, this past weekend was my high school reunion. Most of the folks I went to school with I hadn't seen in quite a long time. It was great catching up with old buddies and even making a couple of new ones, too.  Something I learned: it was amazing how many of us had a ton of drama going on, yet each of us seemed to be oblivious to it. We had each been deep in our own juju, thinking the chaos had only been in our own universe. Little did we know that there was stress, drama and loss going on with each of us. It reminded me of a quote I had posted for quite sometime (though I can't remember who should get credit for it): "We would worry a lot less about what people think of us, if we realized how little they do."  Ain't that the truth?

"I"

My eldest was working feverishly on homework duty, all in an endeavor to earn some "PBSKids" time on the ol' tellie. As she was reviewing her spelling words with me, she asked, "Mommy, what if we couldn't say 'I'?"

Immediately, I was struck by the challenge. Good heavens? Could I make it through a day, much less an hour, without saying 'I'? What if I attempted to avoid 'me' and 'my' as well? The thought of how egocentric I'd reveal myself to be brought on a wave of self-loathing. I sure am an arrogant something-or-other. For heaven's sake, there are at least four infractions within THIS paragraph alone!

I kept poking at the food in the pan with my spatula, vigorously shaking the pan like I had something to prove. Without being able to stifle my bewildered heart I replied, "Wow. That would be awfully hard."

With a huge smile on her face, she came back with, "I know! You wouldn't be able to say the word 'ti-iiime' anymore. Or li-iiike!..." She drew out the long 'I' sound to drive her point home. Meanwhile, I had paused. First, there was that feeling of a mild sense of relief. And I chuckled along with her while we bantered back and forth, coming up with every long 'I' containing word we could think of.

But that deeper philosophical question
nagged at me and I wondered again at the idea, the challenge. In the ego-centric society we live in, writing about our mundane ins and outs for complete strangers to read as though it's as exciting as Koontz, would it hurt to veer away from 'me' for awhile? Pepper my conversation with a lot less 'me' and a bunch more 'we'? And for once, maybe beauty could be found in the 'you', and not in the 'I', of the beholder.